Window Seal Kits for Portable Air Conditioners: What Works
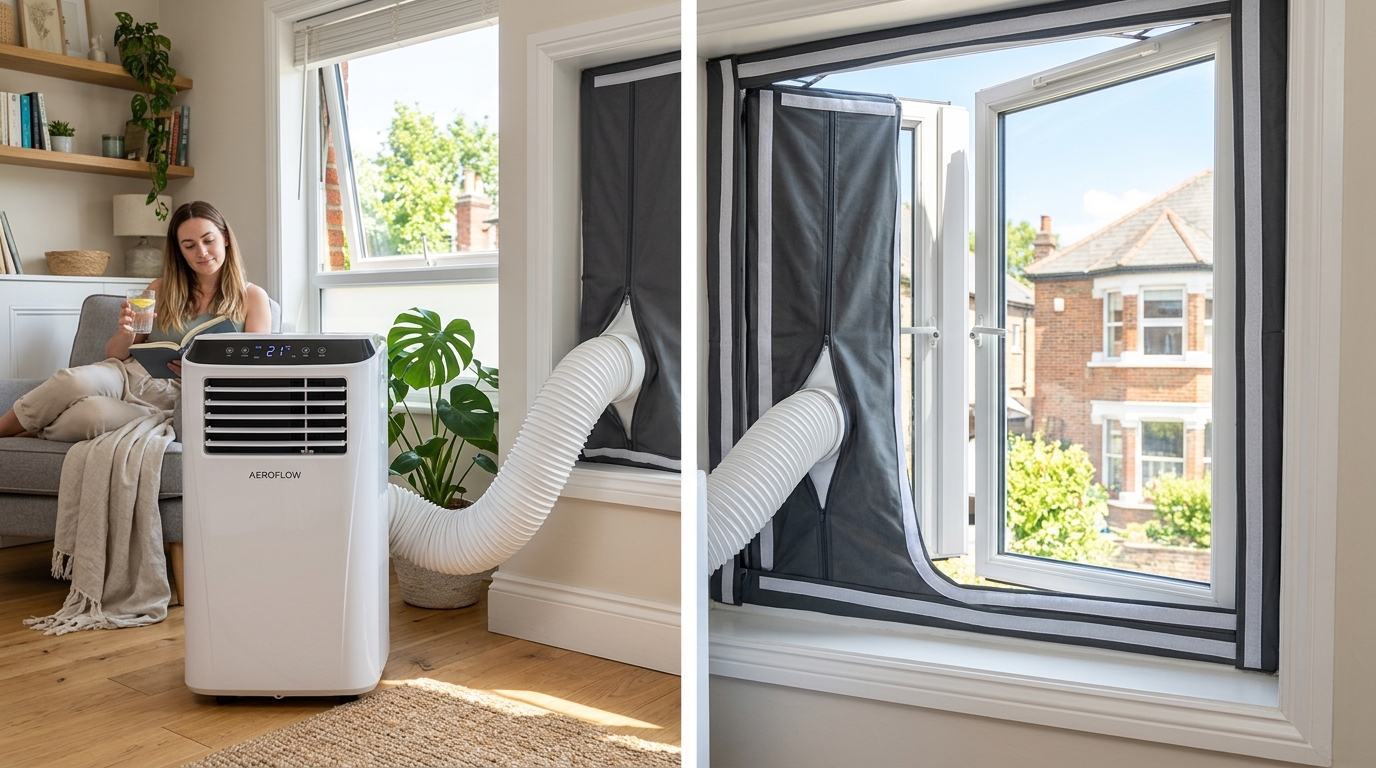
This is the highest-value thing you can improve about a portable air conditioner, and almost everyone underdoes it. With a single-hose unit, room air is expelled outside, putting the room under slight negative pressure — so every gap around your window kit isn’t a passive leak, it’s actively sucking warm outside air in. The supplied slider kit fits UK casement windows badly or not at all. The reliable fix is a rigid cut panel sealed with foam tape; a fabric zip kit is the no-cutting alternative and seals less well.
Sealing properly is free or nearly free, and it makes more difference than buying a bigger unit.
Why the gaps matter more than you’d think
Most portable units are single-hose: they draw air from the room, use it to cool the condenser, and expel it outside. That air has to be replaced, and it’s replaced by outside air drawn in through whatever gaps exist — around the window kit, under the door, through the letterbox.
So a gap around your panel is a route for warm outside air to be pulled directly into the room you’re cooling. Our hose comparison explains the physics.
The practical consequence: a well-sealed 9,000 BTU unit will outperform a badly sealed 12,000 BTU one. Sealing is the cheapest capacity upgrade available.
Why the supplied kit disappoints
Slider kits are designed for sash and sliding windows, which are standard in North America and much less common in UK homes.
Most UK windows are casements that open outward on a hinge. A slider kit has nothing to slide against, and the openings are often too narrow for its adjustment range anyway. Bay windows, sash windows, tilt-and-turn and roof windows all present their own version of the problem.
Even where a slider kit does fit, it usually fits approximately — with gaps at the ends, along the frame, and around the hose coupling.
Option 1: A rigid cut panel (best seal)
What most people end up with, and what we’d recommend for a window you’ll use every summer.
Materials:
- Foam board — cheap, light, cuts with a craft knife, insulates well. Least durable, and pushable from outside.
- Acrylic or polycarbonate — durable, tidy, lets light through, cuts with the right blade. More expensive and less forgiving to cut.
- Thin plywood or MDF — cheap and solid, blocks light entirely, needs sealing if it’ll get damp.
Method: measure the opening aperture, cut the panel to fit exactly, cut a hole for the hose coupling, and seal the edges with foam tape.
Make it removable. Friction-fit with foam tape rather than screwing or gluing — you’ll want the window back in winter, and in a rented property you need to leave no trace. Our renter’s guide covers doing this without risking a deposit.
Option 2: A fabric zip kit (no cutting)
Purpose-made fabric panels that attach around the window frame with hook-and-loop tape and zip closed around the hose.
They adapt to shapes a rigid panel can’t, need no tools, and remove completely. They seal less well than a rigid panel — fabric leaks at the edges — and the adhesive can mark paintwork.
Measure your frame profile against the product before buying. Not all kits suit all frames, and this is the commonest reason they get returned.
Option 3: A permanent wall vent (best of all)
For a room you’ll cool every summer, this is the proper answer: core-drilled, with an external grille and backdraught flap. Seals better than any window kit, looks tidy, and removes the annual faff.
It’s a builder’s job. If you rent you need written permission; if the property is leasehold, likely freeholder consent — our leasehold guide covers that; and if it’s listed or in a conservation area, a new external grille may need consent, covered in our heritage guide.
Sealing properly: the checklist
- ☐ Foam tape around every edge of the panel
- ☐ Check the hinge side — easily missed on a casement
- ☐ Check the hose coupling at the panel
- ☐ Check the coupling at the unit — these work loose
- ☐ Fill any gap at the top or bottom of the aperture
- ☐ Close the room door while running
- ☐ Block the gap under the door with a draught excluder if it’s significant
- ☐ Re-check after a week — panels settle, tape compresses
Test it: with the unit running, hold your hand around the panel edges. Air being drawn in means a gap. It’s a cruder test than it sounds but it finds most leaks.
Security — worth taking seriously
What helps: use a rigid panel rather than foam where the window is accessible; fit a window restrictor that still lets the casement close onto the panel; don’t leave the setup in place while the house is empty for any length of time; and check your contents insurance — an insecure window can affect a claim. Our home security guide covers the wider picture.
The picks
A fabric window seal kit
No cutting, fully removable
No tools
Removes completely
The practical choice if you don’t want to cut a panel, and the one that suits UK casement and awning windows the supplied slider kit ignores. Look for one that states compatibility with your window type, and measure your frame before ordering — sizing is the commonest reason these get returned.
Good for: renters and leaseholders, awkward or non-rectangular openings, and anyone who wants the window back intact in September.
Less good for: sealing as well as a rigid panel — fabric leaks at the edges, which matters with a single-hose unit. The adhesive can lift paint, so test a small area first. And it offers no security at all on an accessible ground-floor window.
Self-adhesive foam draught tape
Cheapest real improvement
Removable
Works in winter too
Unglamorous and the highest value per pound on this page. Whatever panel you use — supplied slider, cut board or fabric kit — foam tape around the edges is what turns an approximate fit into a proper seal. Get a roll thicker than you think you need; compressible foam accommodates uneven gaps better than thin tape.
Good for: everyone, regardless of which kit you’re using; and the same roll does your draughty doors in winter.
Less good for: large gaps — it seals millimetres, not centimetres. If there’s a substantial gap, you need a bigger panel, not more tape. Cheap tape also perishes and leaves residue, so buy a decent one and test on paintwork first.
Window-type specifics
- Casement — cut panel or fabric kit. Watch the hinge side.
- Sash — a slider kit may fit, but sealing the meeting rail matters. Our sash window guide covers it.
- Bay — a cut panel in one casement, nearest the unit. Our bay window guide covers it.
- Tilt-and-turn — the tilt position leaves wedge-shaped gaps that are awkward to seal; a fabric kit designed for tilt windows handles this better than improvising.
- Roof window — difficult, because the hose must rise and a sloped opening is hard to seal. Our skylight guide covers it.
- Restricted opening — don’t defeat the restrictor. Our windowless room guide covers alternatives.
Frequently asked questions
How much difference does sealing actually make?
Enough that we’d rank it above buying a bigger unit. With a single-hose unit the room is under negative pressure, so gaps are actively pulling warm air in rather than passively leaking.
Can I just stuff a towel in the gap?
Better than nothing for one evening, but it compresses, falls out, and holds moisture against the frame. Foam tape costs very little and works properly.
Do dual-hose units still need sealing?
Yes — less critically, since there’s no negative pressure effect, but a gap still lets warm air in. Seal it either way.
Will a seal kit stop insects getting in?
A well-sealed rigid panel largely will. Fabric kits vary. If that’s a priority, a rigid panel with tape is the better choice.
Sources
- Energy Saving Trust — Windows and doors
- Energy Saving Trust — Draught-proofing
- GOV.UK — Approved Document F: Ventilation
- Police.uk — Burglary prevention advice
Related reading: our hose comparison and windows and doors guide.
Compare window seal kits at Amazon UK. Measure your frame profile before ordering — sizing is the commonest reason these get returned.