How to Draught-Proof and Insulate a Loft Hatch (UK)
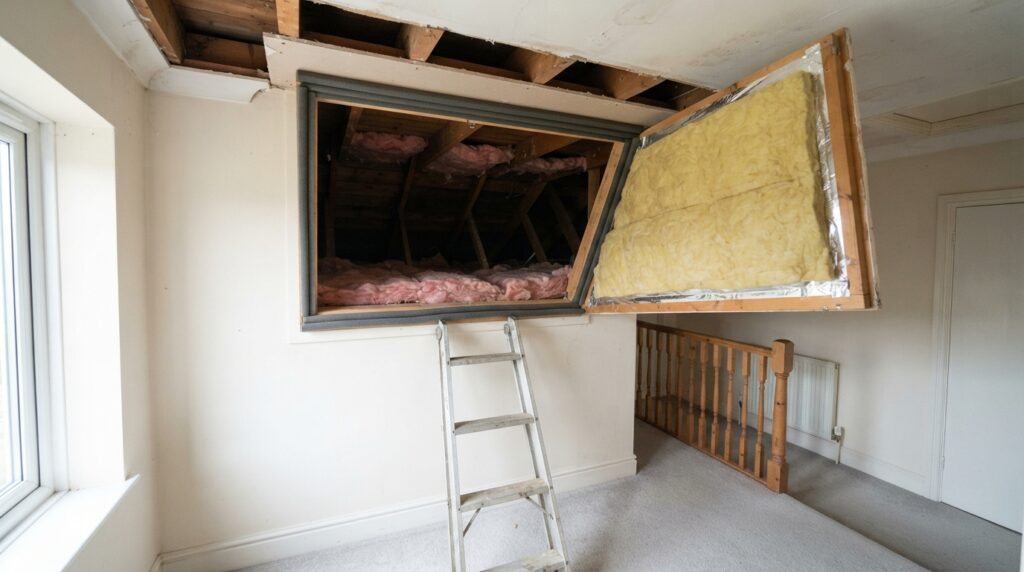
In many homes the loft hatch is a thin board sitting loosely in a frame — a cold, draughty gap in an otherwise insulated ceiling. Two jobs fix it. First, fit a compressible draught seal around the hatch — the Energy Saving Trust says you can draught-strip it just as you would a door — with catches or bolts that hold it shut and squash the seal, as Knauf Insulation recommends. Second, fix at least 100mm of insulation to the back of the hatch, the minimum both Knauf and Rockwool give. Sealing it matters for more than warmth: warm, moist air escaping into a cold loft is a common cause of condensation in the roof space. If your hatch is fire-rated, as it can be in shared houses and some other buildings, replace it like for like rather than modifying it.
You can have 270mm of insulation across the whole loft and still have a cold landing, if the hatch in the middle of it is an uninsulated panel with gaps all the way round. It’s one of the cheapest, quickest draught-proofing jobs in the house, and one of the most overlooked. Here’s how to do it properly.
Why the loft hatch matters
Warm air rises, and the loft hatch sits at the top of the house, often directly above the landing and stairs. The Energy Saving Trust notes that you might notice draughts coming through the loft hatch into the rooms below, and recommends two fixes: fitting an insulated loft hatch, and adding draught-excluder strips around the edges to reduce heat loss and stop cold air getting into the rooms below.
The scale of air movement through ceilings is bigger than most people assume. Research from the Building Research Establishment found that typically about 20% of the air entering a house leaves via its loft, adding to the risk of condensation in the loft and reducing the energy efficiency of the roof. Glidevale, a roof ventilation manufacturer, cites BRE research suggesting that around half of the moisture carried into lofts by air movement passes around the hatch cover.
The condensation problem
What a well-sealed hatch looks like
Knauf’s guidance sums it up in three parts:
- A draught seal around the hatch, on the frame or the stop the hatch rests on.
- Catches or bolts that pull the hatch firmly onto the seal, so it’s compressed rather than just resting on it. Without them, a light hatch sitting on a seal often leaves gaps.
- At least 100mm of insulation on the back of the hatch. Rockwool’s installation guide gives the same 100mm minimum for loft hatch covers.
For new homes, the Building Regulations already expect this. Approved Document L says that where a roof is insulated at ceiling level, loft hatches should be designed and installed to ensure optimum airtightness.
How to do it: step by step
- Check what you’ve got. Push the hatch up and look at it. Is it a thin board? Is there insulation on the back? Is there a seal on the frame? If it has intumescent strips around the edge or a fire-rating label, it may be fire-rated — see the fire safety section below before changing anything.
- Clean the frame where the hatch sits, so a self-adhesive seal will stick.
- Fit a compressible draught seal around the frame or stop, in one continuous run if you can. Foam or rubber “P” or “E” profile strips designed for doors work well. The Energy Saving Trust’s advice is to treat it just like a door.
- Add catches or turnbuttons on the loft side, or a pair of bolts, so the hatch clamps down onto the seal. Knauf specifically recommends catches or bolts to compress the draught seal.
- Insulate the back of the hatch with at least 100mm of mineral wool, or a rigid insulation board, fixed securely so nothing falls when the hatch is opened. Bagging mineral wool in polythene, or using a board, keeps fibres off your head.
- Check it closes and seals all round. Slide a piece of paper between the hatch and seal at a few points: if it pulls out easily, that spot needs more compression.
Or replace the hatch
If the existing hatch is flimsy, warped or too thin to take insulation, a replacement insulated hatch is a straightforward upgrade. Many are drop-down doors with seals built into the frame. Manthorpe’s drop-down loft hatch, sold through Toolstation, has 50mm expanded polystyrene insulation in the door and draught seals both between the ceiling and frame and between the door and frame, with a fitting size of 726 × 562mm. Measure your opening before buying: hatches come in set sizes, and some will need the opening trimmed.
A compressible loft hatch draught seal
A ten-minute job that stops the draught
Fits round the frame or stop
Pair with catches to compress it
Any good-quality compressible door draught strip will do the job — look for a “P” or “E” profile rubber strip rather than thin open-cell foam, which flattens quickly. Measure the perimeter of your hatch opening and buy a little extra. The seal only works if the hatch presses down on it, so pick up a couple of turnbuttons or bolts at the same time.
Good for: any existing hatch in sound condition; stopping draughts onto the landing; renters, as it’s cheap and easy to remove.
Less good for: warped or very thin hatches that won’t close evenly — replace those. It doesn’t insulate the hatch itself, so do the 100mm insulation too.
Manthorpe insulated drop-down loft hatch
Sealed and insulated in one
Seals at ceiling and door
726 × 562mm fitting size
Based on the retailer’s listing, this replacement hatch has a 50mm expanded polystyrene insulated door and draught seals between the ceiling and frame and between the door and frame, with a 726 × 562mm fitting size. It’s listed as not fire rated, so it’s for ordinary houses rather than anywhere a fire-rated hatch is required. 50mm is below the 100mm Knauf and Rockwool give for insulating a hatch, so many people add extra insulation on top.
Good for: replacing a flimsy or warped hatch in a house; a neat drop-down door with integrated seals.
Less good for: shared houses or anywhere else a fire-rated hatch is needed. Openings that don’t match the fitting size will need work.
Fire-rated hatches in flats and shared houses
Don’t seal the loft itself
Sealing the hatch is about stopping warm, moist air getting into the loft. It’s not about making the loft airtight. The Energy Saving Trust is clear that good ventilation is still essential and that you shouldn’t block vents or the airflow needed for the building. Leave eaves vents, roof vents and any gaps the loft relies on for ventilation alone.
Watch the pipes up there
Once the loft is better insulated and sealed from the house, it gets colder. The Energy Saving Trust warns that after insulating, pipes or water tanks in the loft are more at risk of freezing in winter. Severn Trent Water’s advice is to protect any water pipes exposed to cold temperatures, including those in lofts, with lagging. Do it at the same time as the hatch.
What it saves
The Energy Saving Trust doesn’t give a figure for the loft hatch on its own. For context, it says draught-proofing windows, floors and doors could save around £55 a year in Great Britain and £80 in Northern Ireland, and topping up loft insulation from 120mm to the recommended 270mm could save around £17 a year in Great Britain and £20 in Northern Ireland. The hatch is a small part of that, but it’s also one of the cheapest parts to fix, and it can be the reason a landing feels cold. Our draught-proofing guide covers the rest of the house.
Frequently asked questions
How do I stop a draught coming through my loft hatch?
Fit a compressible draught seal around the hatch frame, as you would on a door, and add catches or bolts so the hatch presses firmly onto it. The Energy Saving Trust recommends draught-proof strips, and Knauf recommends catches or bolts to compress the seal.
How thick should loft hatch insulation be?
Knauf and Rockwool both give a minimum of 100mm of insulation on the back of a loft hatch.
Can sealing the loft hatch cause condensation?
Sealing the hatch reduces condensation risk, because it stops warm, moist household air getting into the cold loft. What you shouldn’t do is block the loft’s own ventilation, such as eaves vents. The Energy Saving Trust says good ventilation is still essential.
Can I insulate a fire-rated loft hatch?
Check first. Fire-rated hatches are used in some buildings, such as shared houses, as part of the fire protection. Ask your landlord or building manager, and if you replace one, choose a hatch with the same fire rating.
Sources
- Energy Saving Trust — Draught-proofing
- Energy Saving Trust — Roof and loft insulation
- Knauf Insulation — Technical guide to loft insulation
- Rockwool — Roll installation guide
- BRE — Airtightness of ceilings: energy loss and condensation risk (IP4/06)
- GOV.UK — Approved Document L, Volume 1: Dwellings
- Hertsmere / Hertfordshire Building Control — Technical leaflet: permeable underlays
- Great Yarmouth Borough Council — Fire precautions in dwellings: means of escape
- Toolstation — Manthorpe drop-down loft hatch
- Severn Trent Water — Protecting your pipes
Related reading: our draught-proofing guide, loft insulation explained and why your bedroom is freezing but the living room is warm.
Compare current compressible draught seals at Amazon UK.